Performance Data
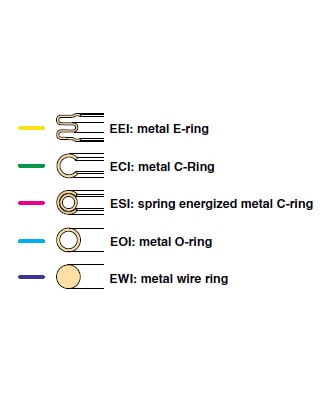
Load, Deflection and Springback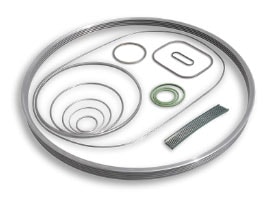 All metal seals, except for metal wire rings, are designed to undergo both plastic and elastic deformation when installed. (Wire rings are essentially limited to plastic deformation only.)
Plastic deformation of the jacket, or O-ring tubing, enlarges the contact area, or "footprint," to bridge across surface imperfections or tool marks in the mating surfaces. It also creates a reduced gradient in the load/deflection curve to permit a wide tolerance in the working height, resulting in a robust sealing process. High integrity sealing is ensured by the ductile outer layer or coating which, being inelastic and of low compressive yield strength, flows into and fills the mating surface crevices.
Elastic deformation provides elastic recovery or "springback" to maintain good sealing, despite separation of the mating surfaces due to the effects of thermal cycling, flange rotation, applied mechanical or hydrostatic loads or creep.
• Learn more about the terminology here.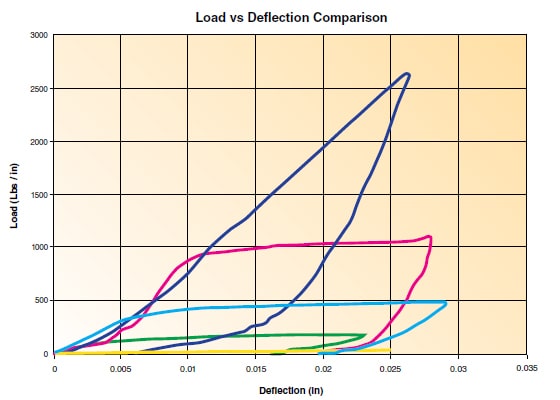
Performance Data
Click the images below to download performance data for the Metal Seals listed below.
Leak Rate Information
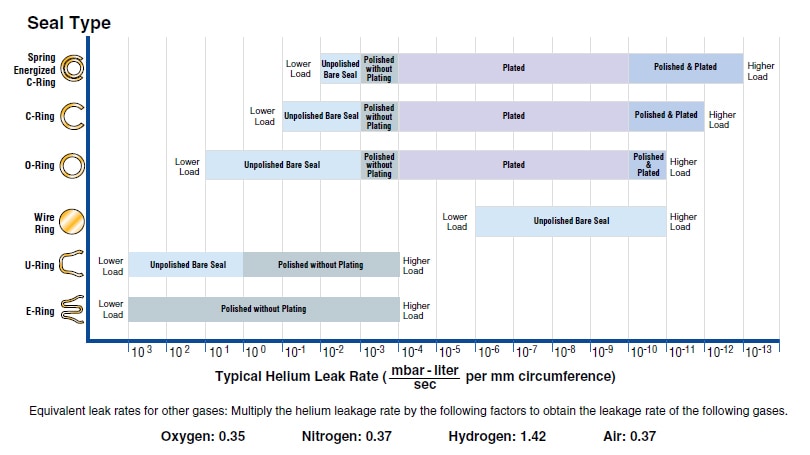
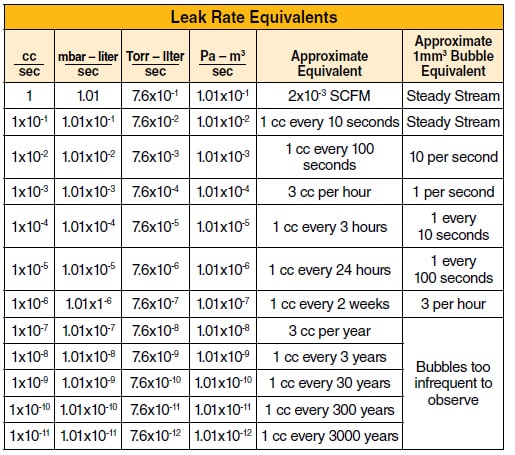
The graph above shows typical ranges of leakage rates that may be expected with various types of seals. Testing was performed using helium mass-spectroscopy leakage detection. A standardized condition of 1 atmosphere differential pressure at 70°F was used in all cases. Test procedures and installation parameters were in accordance with the recommendations given in this design guide including a surface roughness of 16-32 μ inch Ra.
The widths of the horizontal bars indicate the spread of leakage values that may be expected depending on the specific plating selection and surface condition. (It should be noted that these results are not directly applicable to liquids, since the much higher viscosities and surface tension will generally prevent leakage entirely).
As a service to our customers, we are pleased to offer specific seal performance testing and analysis for unusually challenging and "mission critical" applications. Testing can be set up to reproduce the actual conditions expected in service. Please contact your local Parker representative.
• Download Leak Rate Information
Fatigue and Stress Relaxation
Fatigue is the main failure mechanism in a material that is subjected to fluctuating loads. Under cyclic loading, localized slip bands can form in regions of high localized stresses. As fluctuating loading continues, these bands increase in number and small microscopic cracks form. Given enough time and stress amplitude, the cracks will grow and propagate through the wall of the seal resulting in a fatigue failure and leakage.
• Download Fatigue and Stress Relaxation Data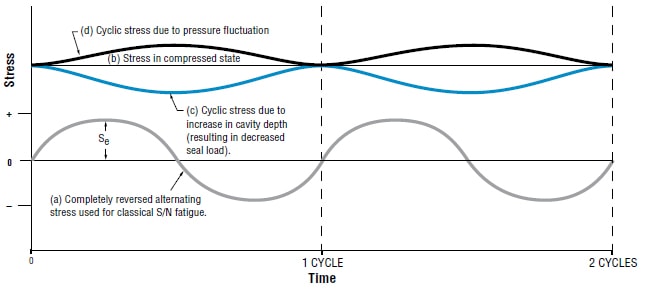
Stress Relaxation
Any highly stressed component, held at high temperatures, is subject to a form of permanent deformation known as stress relaxation. Unlike creep, stress relaxation occurs in a relatively short period of time, typically in as little as 100 hours of exposure time. This is an important design consideration in any critical sealing application at elevated temperature. Stress relaxation compromises both the sealing load and springback properties of the seal, impacting its ability to maintain sealing integrity under both static and dynamic conditions.

Parker Hannifin has extensive experience designing and testing seals to combat the negative effects of stress relaxation. Our seals are designed to optimize resistance to stress relaxation through careful consideration of geometry, materials and appropriate heat treatment.
Installation Guidelines
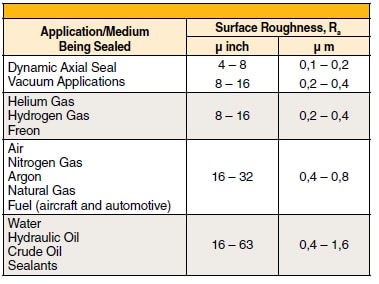 In addition to the required cavity dimensions provided under Material Selection, there are other important cavity design issues which affect seal performance including the roughness and waviness of the mating surfaces.
Surface Roughness Recommendations
The roughness of the mating surfaces directly affects the leak rate when using unplated seals. Selecting high load seals with appropriate plating can substantially offset the affects of rough finishes; however, the guidelines in the table, left should be followed whenever possible. We also recommend a turned finish with a circular lay.
Surface Flatness Recommendations
Metal seals can accommodate some degree of waviness, or lack of flatness of the mating surfaces. Spring energized seals offer the greatest amount of compliance since each coil of the spring acts as an independent force to assist the jacket in conforming to the mating surface.
Surface Hardness Recommendations
Many metal seals are designed to produce high seating loads against the mating surfaces to meet ultra low leakage requirements. To withstand these high compressive stresses, without damage to the sealing surfaces, requires these surfaces to have a hardness of at least 35 Rc. This is particularly important when the seal seating load exceeds 200 lb/inch (35 N/mm) of circumference. Dynamic axial seals require a hardness of at least 60 Rc.
• Download Installation Guidelines
• Download Bolt Load & Tightening Torque Guidelines

Seal Shaping Requirements for Non-Circular Seals
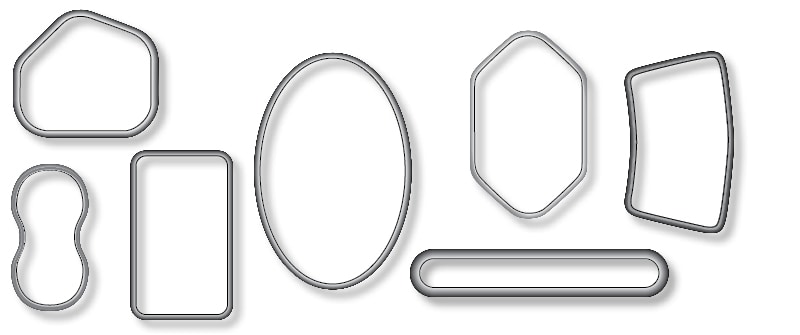 All standard metal seals can be formed into various shapes. The illustration below shows some of the many shapes in which metal seals can be made. For applications as varied as fuel nozzle mounting flanges on aircraft gas turbine engines, or dies for extrusion of plastic film, the availability of specially shaped metal seals offers the greatest design flexibility.
Download our table which provides the minimum outer corner radius for the various cross sections of metal C-rings, O-rings, spring energized C-rings, wire rings, E-rings and U-rings. All shaped seals are custom designed by our engineers.
• Download chart for Minimum Inside Bend Radius of Seal
Metal Seal Manufacturing Specifications
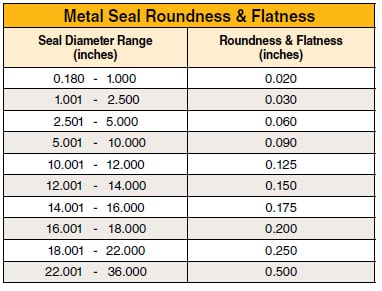 The table shown provides the allowable roundness and flatness for standard metal seals: C-rings, E-rings, O-rings, U-rings, wire rings, spring energized C-rings, and spring energized O-rings in an unrestrained state. When restrained, the seal diameter shall be within the limits specified in the Material Selection section.
Definition of Roundness
Difference between the largest measured reading and the lowest measured reading.
Metal Seal Surface Finish
All unplated and plated metal seals are produced with a 16 μ inch Ra surface finish.
Metal O-Ring Weld Finishing
The Metal O-Ring weld process results in a weld fillet which is finished and smoothed to the adjacent surfaces. The surface at the blend area shall not be more than 0.002 inch below the adjacent surfaces.
C-Ring Sizes and Additional Tables
Preferred C-Ring Sizes Internal Pressure Face Seal
Parker C-rings and spring energized C-rings are available in a virtually unlimited number of sizes. Each uniquely sized seal is produced with tooling specifically made for that size. Choosing one of the diameters listed below typically will result in a cost saving and reduced delivery times. Below is a list of the preferred C-ring and spring energized C-ring sizes.
• Preferred C-Ring Sizes Internal Pressure Face Seal
• Preferred C-Ring Sizes External Pressure Face Seal
• Preferred Axial C-Ring Sizes
Tolerance Reference & Conversion Tables
• Tolerance Reference & Conversion Tables
Download these tables consistent with the American National Standard Tolerances (ANSI B4.1) and the British Standard for Metric ISO Limits and Fits (BS 4500).


